layui是一款经典国产模块化前端UI框架,首先看看官方的介绍:
layui(谐音:类UI) 是一款采用自身模块规范编写的前端 UI 框架,遵循原生 HTML/CSS/JS 的书写与组织形式,门槛极低,拿来即用。其外在极简,却又不失饱满的内在,体积轻盈,组件丰盈,从核心代码到 API 的每一处细节都经过精心雕琢,非常适合界面的快速开发。layui 首个版本发布于2016年金秋,她区别于那些基于 MVVM 底层的 UI 框架,却并非逆道而行,而是信奉返璞归真之道。准确地说,她更多是为服务端程序员量身定做,你无需涉足各种前端工具的复杂配置,只需面对浏览器本身,让一切你所需要的元素与交互,从这里信手拈来。文章源自陈学虎-https://chenxuehu.com/article/2018/05/7200.html
文章源自陈学虎-https://chenxuehu.com/article/2018/05/7200.html
使用起来,还是很顺手的,因需要上传图片,就看看文件上传组件如何,首先看官方的文档文章源自陈学虎-https://chenxuehu.com/article/2018/05/7200.html
接下来就开始动手了,首先你需要准备好一个laravel应用,这里就不做介绍了,接着将下载好的layui文件夹放到应用的public目录中,结构基本如下:文章源自陈学虎-https://chenxuehu.com/article/2018/05/7200.html
 文章源自陈学虎-https://chenxuehu.com/article/2018/05/7200.html
文章源自陈学虎-https://chenxuehu.com/article/2018/05/7200.html
然后我们写好前台文件,直接上代码,我直接写在默认的视图文件中文章源自陈学虎-https://chenxuehu.com/article/2018/05/7200.html
文章源自陈学虎-https://chenxuehu.com/article/2018/05/7200.html
resources\views\welcome.blade.php文章源自陈学虎-https://chenxuehu.com/article/2018/05/7200.html
文章源自陈学虎-https://chenxuehu.com/article/2018/05/7200.html
<!doctype html>
<html lang="{{ app()->getLocale() }}">
    <head>
        <meta charset="utf-8">
        <meta http-equiv="X-UA-Compatible" content="IE=edge">
        <meta name="viewport" content="width=device-width, initial-scale=1">
        <meta name="csrf-token" content="{{ csrf_token() }}">

        <title>Laravel</title>

        <link rel="stylesheet" href="../layui/css/layui.css">

        <style type="text/css">
          .layui-upload-img
          {
            width: 92px;
            height: 92px;
            margin: 0 10px 10px 0;
          }
        </style>

    </head>
    <body>
        <div class="flex-center position-ref full-height">
            <div class="content">
                <fieldset class="layui-elem-field layui-field-title" style="margin-top: 30px;">
                    <legend>高级应用:制作一个多文件列表</legend>
                </fieldset>

                <div class="layui-upload">
                    <button type="button" class="layui-btn layui-btn-normal" id="testList">选择多文件</button>
                    <div class="layui-upload-list">
                      <table class="layui-table">
                        <thead>
                          <tr><th>文件名</th>
                          <th>大小</th>
                          <th>状态</th>
                          <th>操作</th>
                        </tr></thead>
                        <tbody id="demoList"></tbody>
                      </table>
                    </div>
                    <button type="button" class="layui-btn" id="testListAction">开始上传</button>
                  </div>

                  <div class="layui-upload">
                      <blockquote class="layui-elem-quote layui-quote-nm" style="margin-top: 10px;">
                        预览图:
                        <div class="layui-upload-list" id="demo2"></div>
                     </blockquote>
                    </div>

            </div>
        </div>
    </body>
    <script src="../layui/layui.js"></script>
    <script>
    layui.use('upload', function(){
      var $ = layui.jquery
      ,upload = layui.upload;

      //多文件列表示例
        var demoListView = $('#demoList')
        ,uploadListIns = upload.render({
          elem: '#testList'
          ,url: '/upload'
          ,field:'photo'
          ,multiple: true
          ,auto: false
          ,headers: {
                'X-CSRF-TOKEN': $('meta[name="csrf-token"]').attr('content'),
            }
          ,bindAction: '#testListAction'
          ,choose: function(obj){
            var files = this.files = obj.pushFile(); //将每次选择的文件追加到文件队列
            //读取本地文件
            obj.preview(function(index, file, result){
              var tr = $(['<tr id="upload-'+ index +'">'
                ,'<td>'+ file.name +'</td>'
                ,'<td>'+ (file.size/1014).toFixed(1) +'kb</td>'
                ,'<td>等待上传</td>'
                ,'<td>'
                  ,'<button class="layui-btn layui-btn-mini demo-reload layui-hide">重传</button>'
                  ,'<button class="layui-btn layui-btn-mini layui-btn-danger demo-delete">删除</button>'
                ,'</td>'
              ,'</tr>'].join(''));

              //单个重传
              tr.find('.demo-reload').on('click', function(){
                obj.upload(index, file);
              });

              //删除
              tr.find('.demo-delete').on('click', function(){
                delete files[index]; //删除对应的文件
                tr.remove();
                uploadListIns.config.elem.next()[0].value = ''; //清空 input file 值,以免删除后出现同名文件不可选
              });

              demoListView.append(tr);
            });
          }
          ,done: function(res, index, upload){
            if(res.code == 0){ //上传成功
              console.log(res.ResultData);
              $('#demo2').append('<img src="/uploads/'+ res.ResultData +'" alt="'+ res.ResultData +'" class="layui-upload-img">')
              var tr = demoListView.find('tr#upload-'+ index)
              ,tds = tr.children();
              tds.eq(2).html('<span style="color: #5FB878;">上传成功</span>');
              tds.eq(3).html(''); //清空操作
              return delete this.files[index]; //删除文件队列已经上传成功的文件
            }
            this.error(index, upload);
          }
          ,error: function(index, upload){
            var tr = demoListView.find('tr#upload-'+ index)
            ,tds = tr.children();
            tds.eq(2).html('<span style="color: #FF5722;">上传失败</span>');
            tds.eq(3).find('.demo-reload').removeClass('layui-hide'); //显示重传
          }
        });
    });
    </script>
</html>
然后新建控制器文件
\app\Http\Controllers\HomeController.php
新建如下方法
public function upload(Request $request)
    {

    	$file = $request->file('photo');

    	// 获取文件路径
    	$transverse_pic = $file->getRealPath();
    	// public路径
    	$path = public_path('uploads');
    	// 获取后缀名
    	$postfix = $file->getClientOriginalExtension();
    	// 拼装文件名
    	$fileName = md5(time().rand(0,10000)).'.'.$postfix;
    	// 移动
    	if(!$file->move($path,$fileName)){
    	    return response()->json(['ServerNo' => '400','ResultData' => '文件保存失败']);
    	}
    	// 这里处理 数据库逻辑
    	/**
    	*Store::uploadFile(['fileName'=>$fileName]);
    	**/
    	return response()->json(['code'=>0,'ServerNo' => '200','ResultData' => $fileName]);
    }
注册路由
\routes\web.php
Route::post('/upload','HomeController@upload');
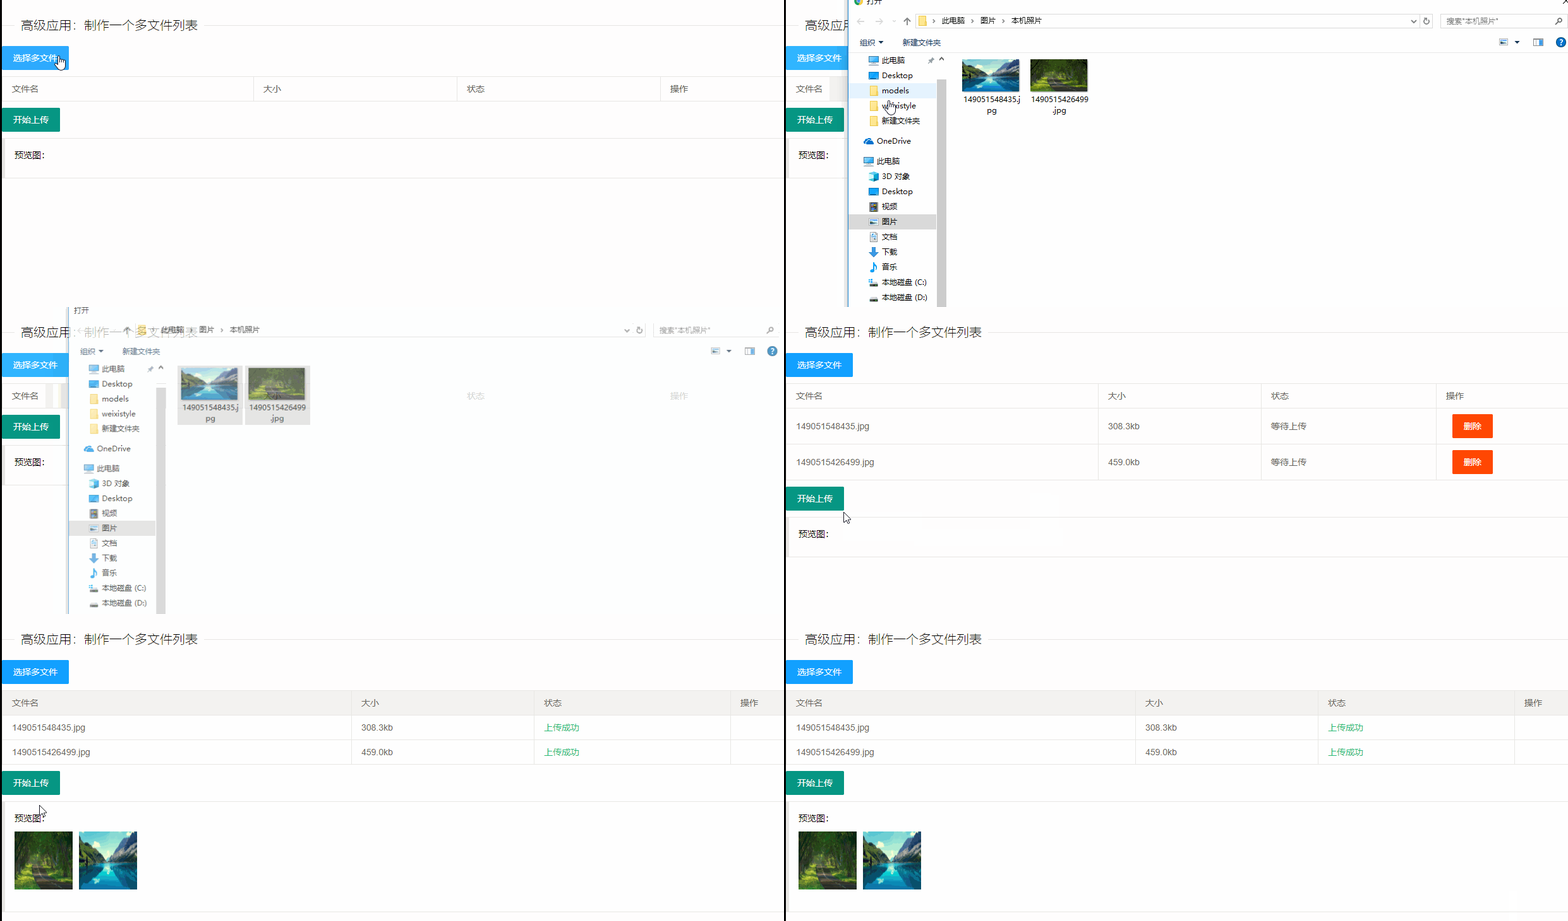
然后开始演示
可以看出整个过程还是很流畅的,操作起来体验很好。










评论